There are several great resources out there for setting up a gaming server on Microsoft Azure. This one is specifically for VirtualRC the R/C racing simulator.
If you want to host a race and participate in the race itself, you’ll need two VRC accounts (and possibly paid subscriptions): one for you and one for the race host. You can host a race with a free VRC account, but you’ll be limited to the free tracks and cars – that’s OK too – you’ll surely get a lot of people joining your server if you’re hosting races on the free-to-play tracks.
But if you want the most flexibility and variety, you’ll need to have the full all-inclusive subscription on your VRC account(s).
Azure Account
If you don’t already, sign up for a free Azure account. They usually give you a $200 credit when you first sign up, which is great to get started with. After about a month of hosting a 2-hour game night once a week, my monthly costs were between $20-30. I thought I could make my $200 credit last for at least 6 months, but sadly the $200 credit only lasts for the first 30 days 😞
But, this is still likely the easiest way to get a rock-solid gaming server set up that does not rely on your home connection.
Azure Setup
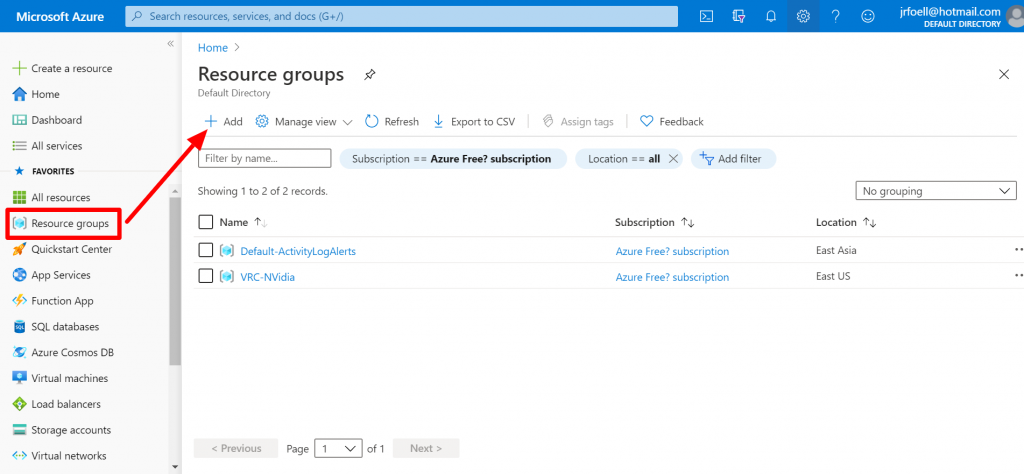
Sign into portal.azure.com. In the left navigation, click Resource groups. Then click Add.
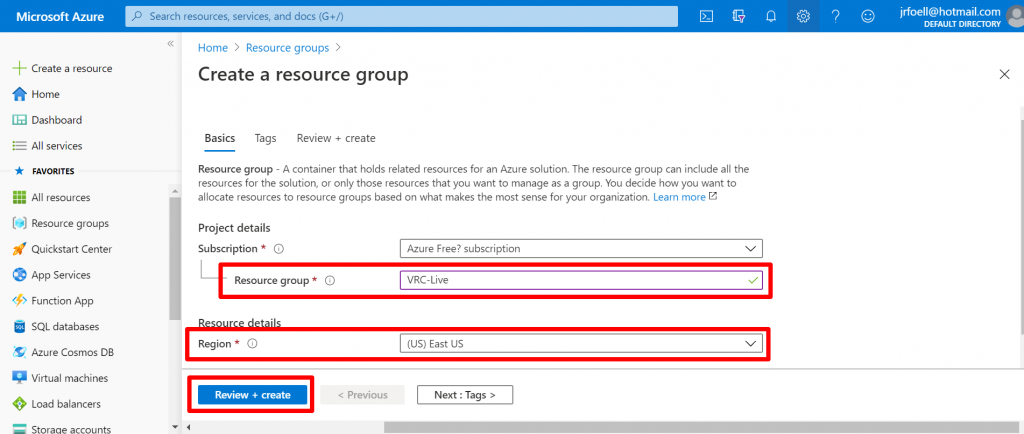
Give your resource group a name. You’ll also need to select a region where your virtual machine (server) will live. You can see what types of virtual machines are available in what regions on this page.
I chose to use an NVidia based system for graphics performance in case I wanted to livestream our races. I thought having the server closer to the racers would be best (North Central US), but there’s another factor to consider: the VRC server is in Europe. So while I want low latency from drivers locations to the Azure server, I also want low latency from the Azure server the VRC server where the races are registered.
I picked East US and it seems to have been a wise choice. My ping times to the VRC server are consistently around 100ms.
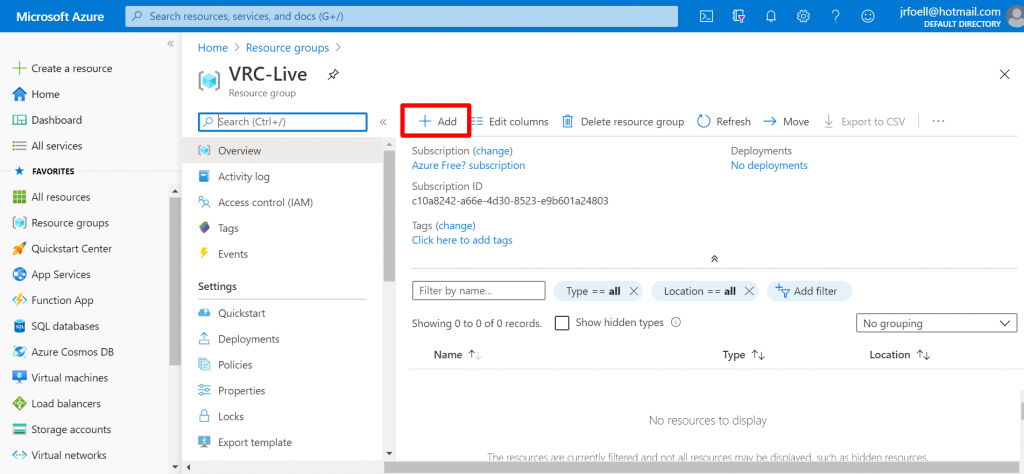
Once your resource group is created, select Add to add a virtual machine (VM) to it.
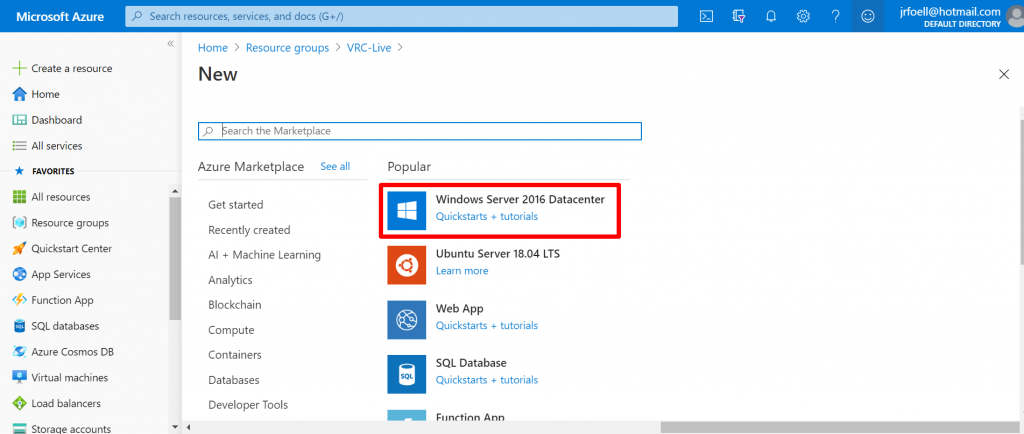
Select Windows Server 2016 Datacenter – we’ll actually update that to the newer 2019 server in the next step. An alternative is to start with Windows 10 Pro, Version 1809 – I have not tried this setup, but I’ve seen it recommended and it may be a better base to start with.
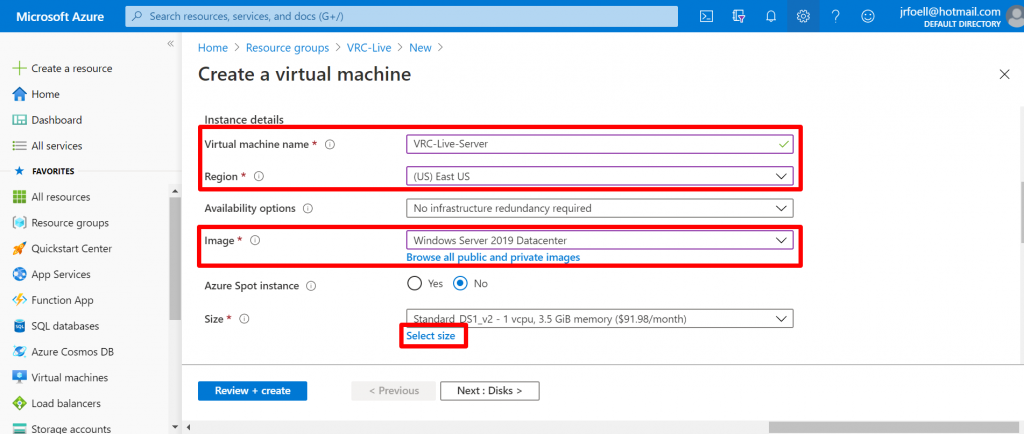
Under the virtual machine Basics your resource group will be pre-selected. Give your VM name and select the same region as your resource group. You can change the image to Windows Server 2019 Datacenter here. Then click Select size to choose the type of VM.
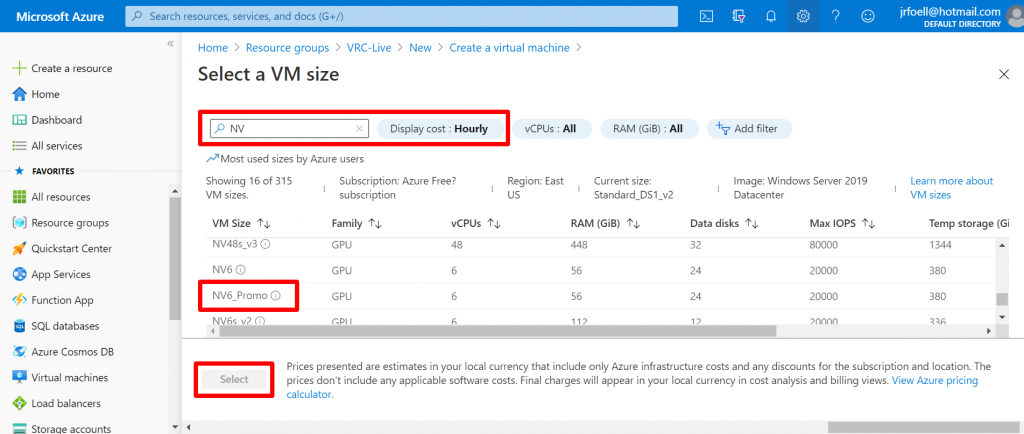
On the VM size selection screen type NV into the search box to limit it to NVidia based servers. I like to change the cost to Hourly so it’s less scary 😬 The server I chose is NV6_Promo – the smallest/cheapest of the NVidia options.
Finding a virtual machine in a region was one of the most frustrating parts for me. I seemed to have activated my Azure account at the height of the Coronavirus pandemic. Many of the servers listed on the Products by region page were not actually selectable in the portal. After some back-and-forth with support, it turned out that they were running out of resources to allocate. Things eventually leveled out and I was able to select the NVidia server I wanted.
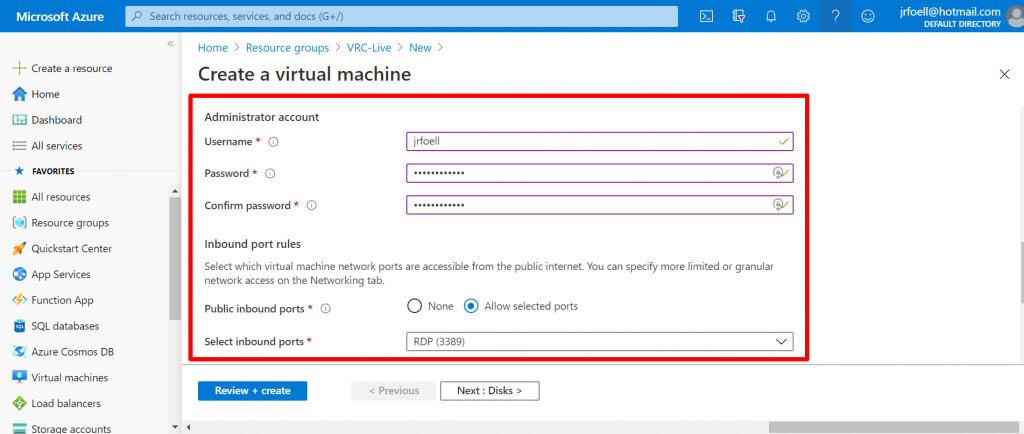
After selecting the VM size, set and record your VM username and password. Make sure to allow remote desktop (RDP) inbound ports. Then click Next : Disks.
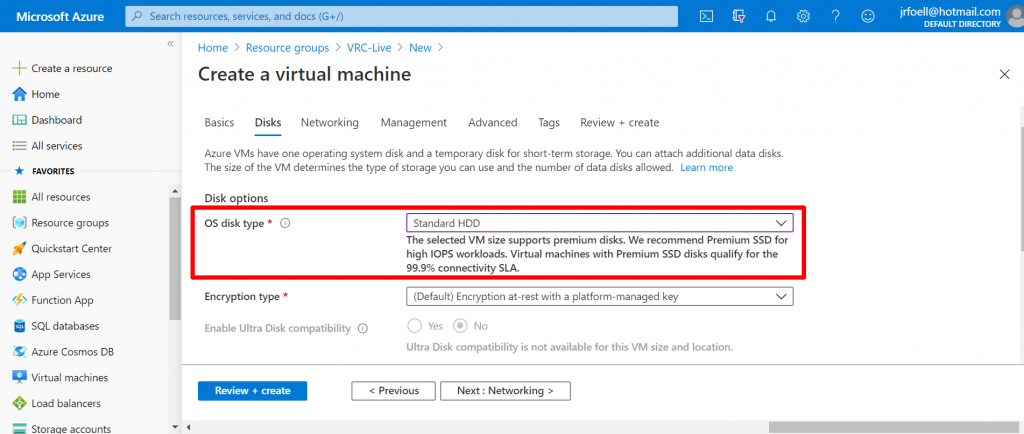
For the OS disk type select Standard HDD – it is cheaper and won’t greatly affect the performance.
Further down that page, click Create and attach a new disk.
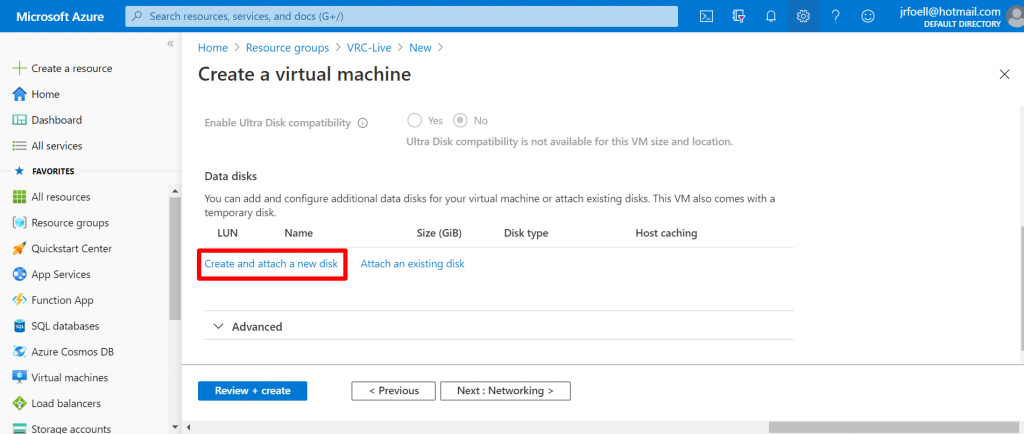
You’ll be prompted to create a new disk, click Change size to change the disk type and size.
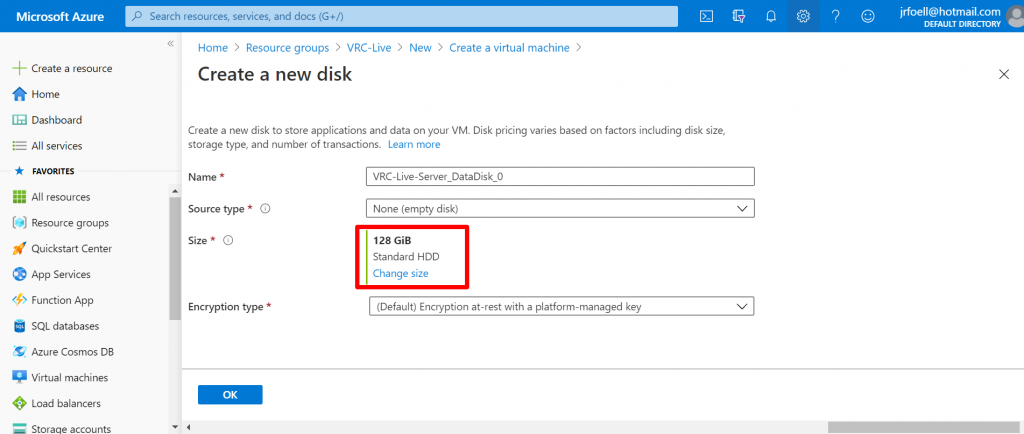
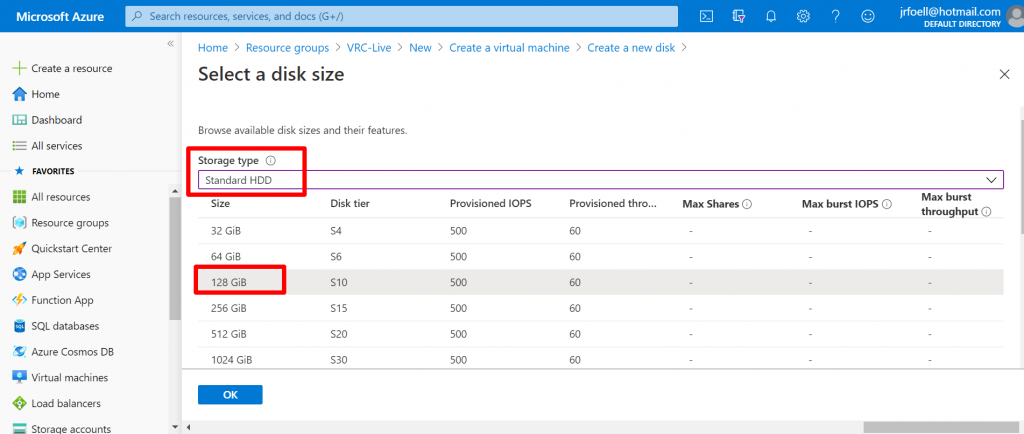
Select Standard HDD for the Storage type. Wait! Didn’t I select a disk before? Why am I doing this again?! The previous selection was for the OS disk. It is temporary storage and nothing gets saved on it when you shut your VM down. You possibly could go without an “external” disk, but you’d have to install and configure VRC (and everything else) every time after you start up your VM.
You don’t need anything big here, just enough for VRC and its libraries. A full installation of VRC with a couple of extras is 20GB, so you could easily select 64GB or even 32GB here. Disks can be made bigger (but not smaller) later on.
Once your disk type and size is selected, click Next : Networking.
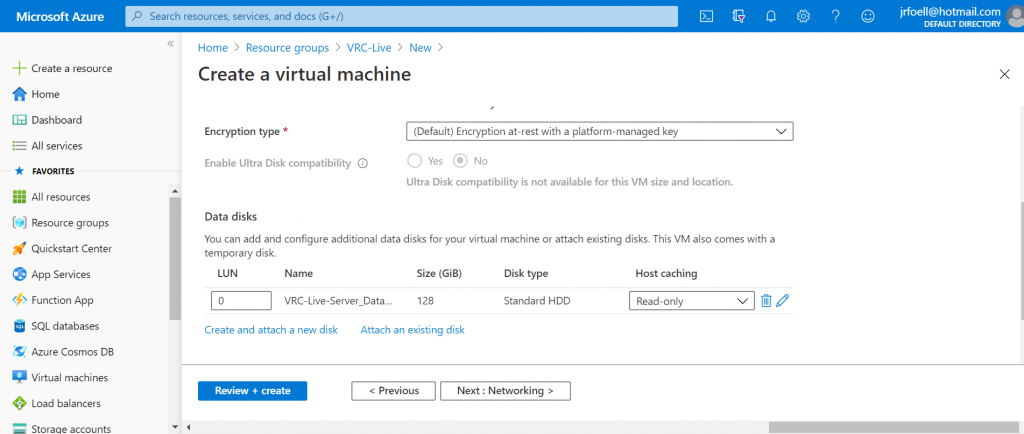
We’ll keep the defaults on the Networking tab, so just click Next : Management. On the Management tab click Enable auto shutdown – this will save your hide if you forget to shut your VM off. Speaking of which, get the Azure app on your phone in case you want to double-check to make sure you actually remembered to shut it down.
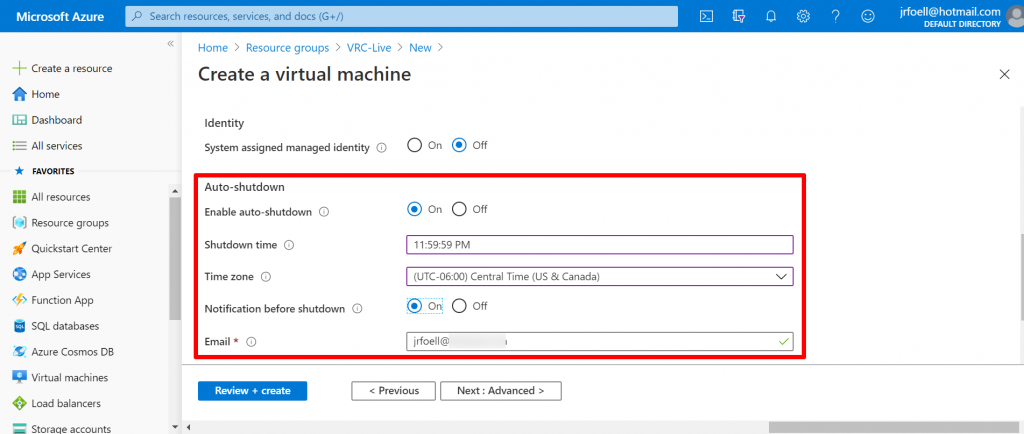
After the Management tab you can click Review + create. On the final page it will tell you how much it costs to run this server hourly. To agree, click Create.
Remove Network Security Group
This is sort of a controversial thing to do. Removing the Network Security Group (NSG) is like connecting your windows computer directly to your cable modem. It’s out there on the internet, available for anyone to hack. I haven’t had much luck getting VRC to play nice with the NSG, because you’ll have to set VRC network rules in Windows Defender Firewall on your VM and mirror those changes in the NSG.
My gaming server is only up for a couple hours at time, and with a different IP address every time. Plus there’s really nothing installed on there that is of value, so it’s a risk I’m willing to take.
Here’s how to remove the NSG. Navigate to your resource group and then click on the NSG for the group.
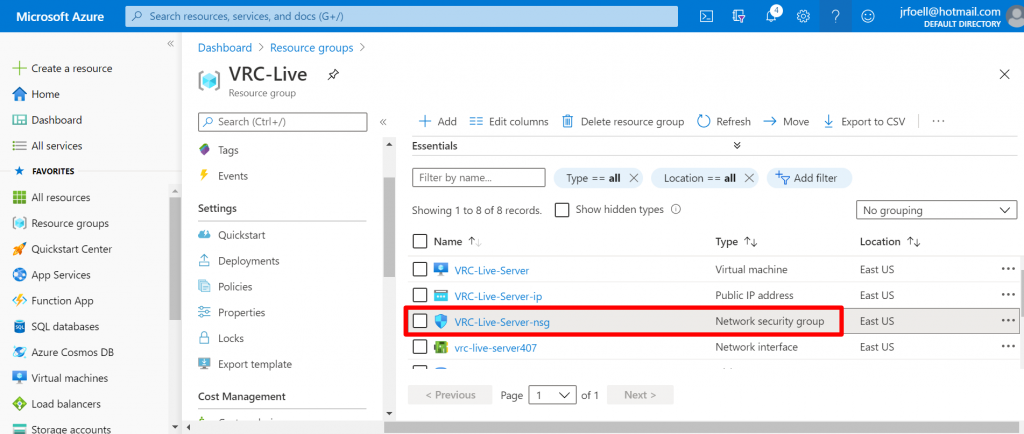
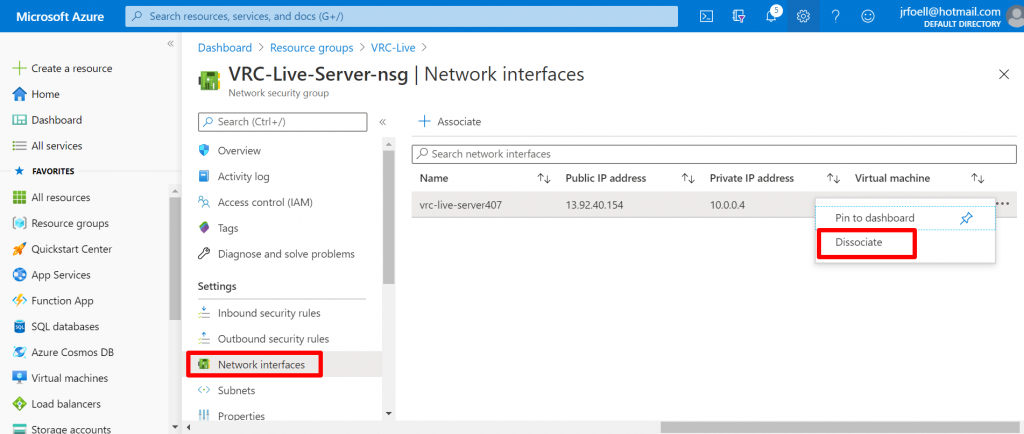
First you must disassociate the NSG with the Network Interface. Click Network Interfaces and then for your interface select the more menu icon then Disassociate.
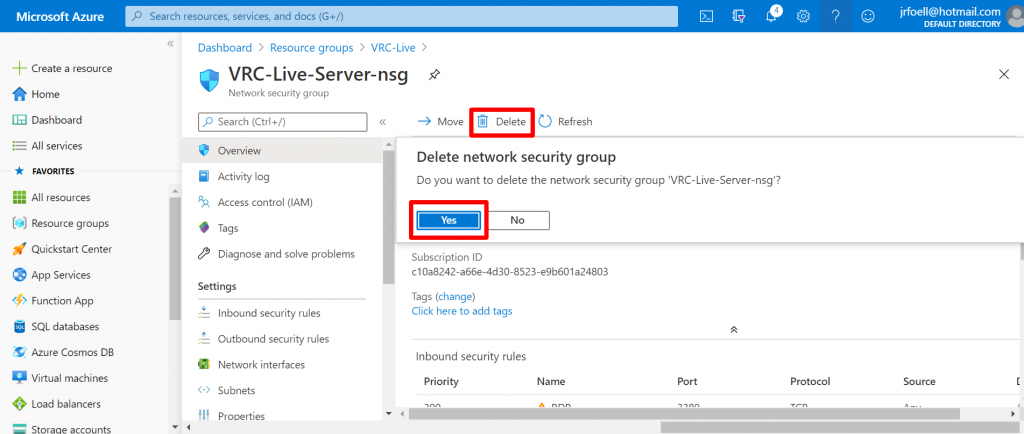
Once it’s been disassociated, you can delete the NSG by going to the Overview screen and clicking Delete.
Start the Virtual Machine
Navigate to your virtual machine under your resource group. Now that your server is created and configured, you can start your VM if it’s not started already. Then copy the Public IP address so we can connect.
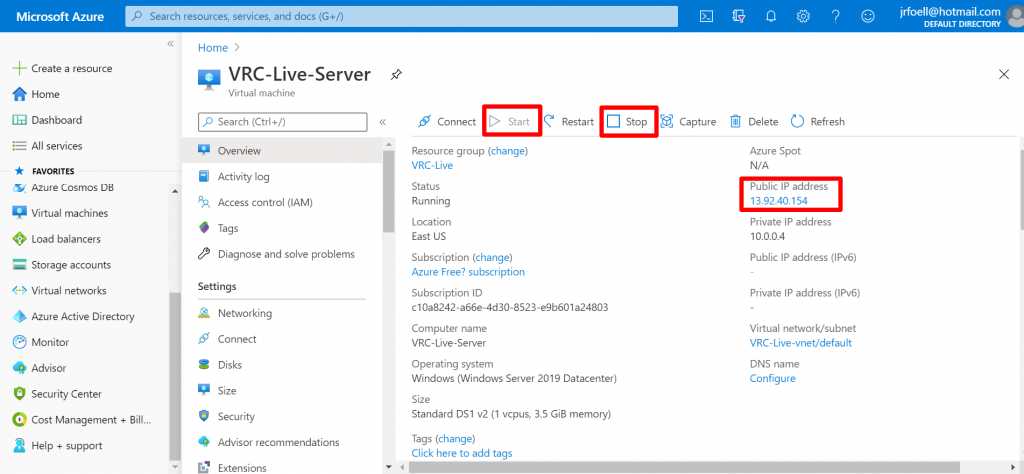
Connect via Remote Desktop
Connect to your virtual machine using the Remote Desktop Connection app from your home computer. Paste in the Public IP address you copied earlier. Before clicking connect, click Show options.
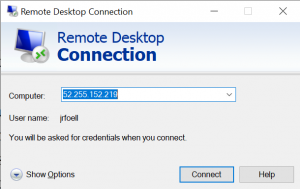
With the options shown you’ll be able to enter your VM administrator username.
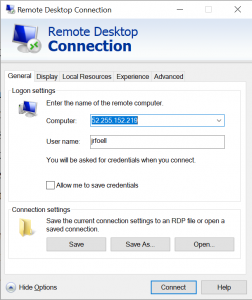
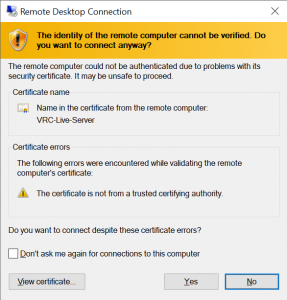
Then click Connect. You’ll get an identity verification warning pop-up, but it’s safe to click Yes to continue.
Install VRC
Once you’re logged into your virtual machine via RDP, you can install VRC.
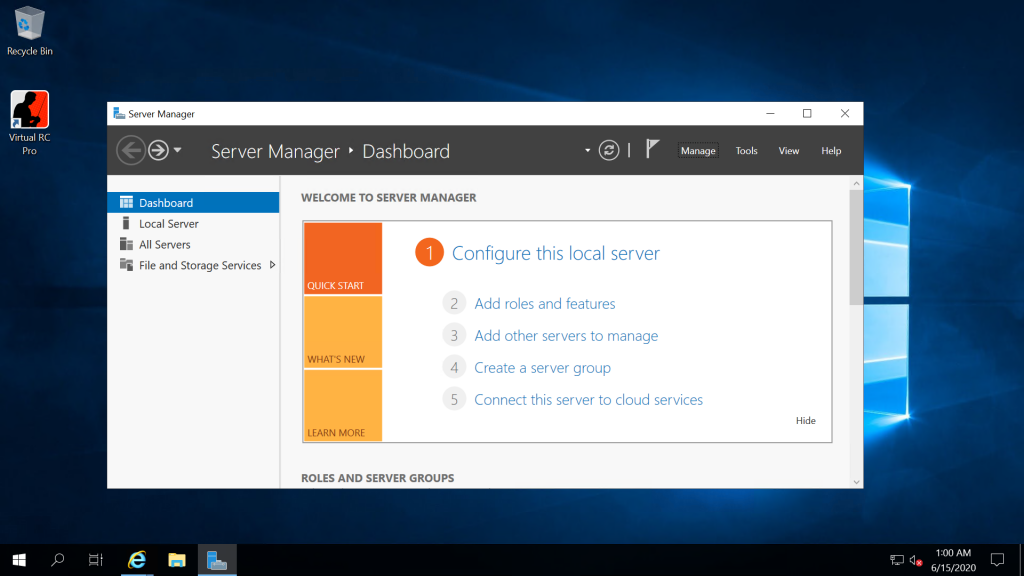
VRC will fail at installing the required .NET components, but you can install them through Server Manager which (annoyingly) will probably be automatically started when you log in through Remote Desktop. Click Add roles and features.
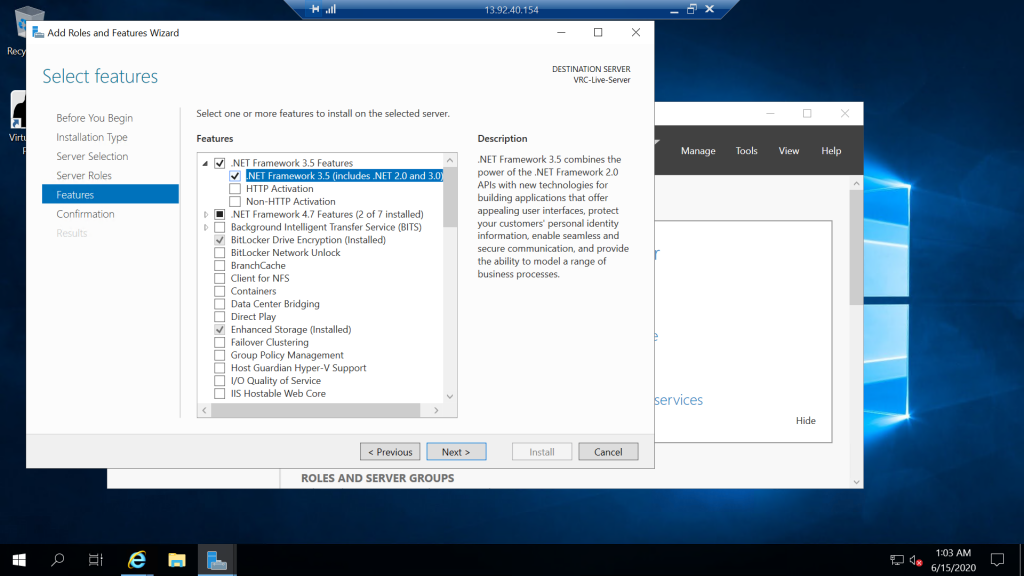
Click Next in the wizard until you’re on the Features screen. There you can expand the .NET Framework 3.5 Features section and check .NET Framework 3.5 (includes .NET 2.0 and 3.0). Then click Install.
Firewall Rules
VRC installs a couple of outbound firewall rules – you might even see this message during installation. But we need to add a couple of inbound firewall rules to Windows Defender Firewall.
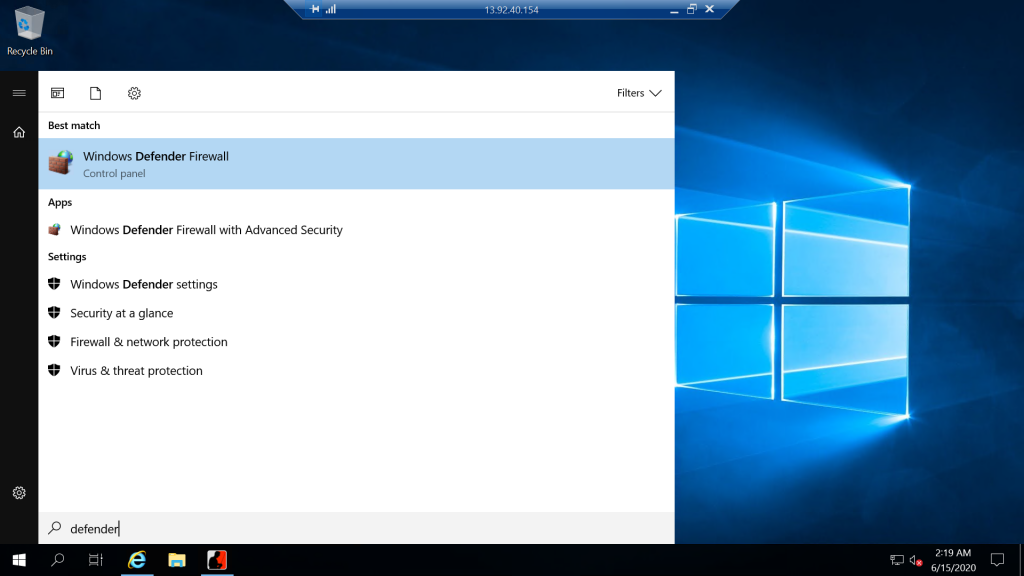
Click the Start Menu and type defender. Then click on Windows Defender Firewall.
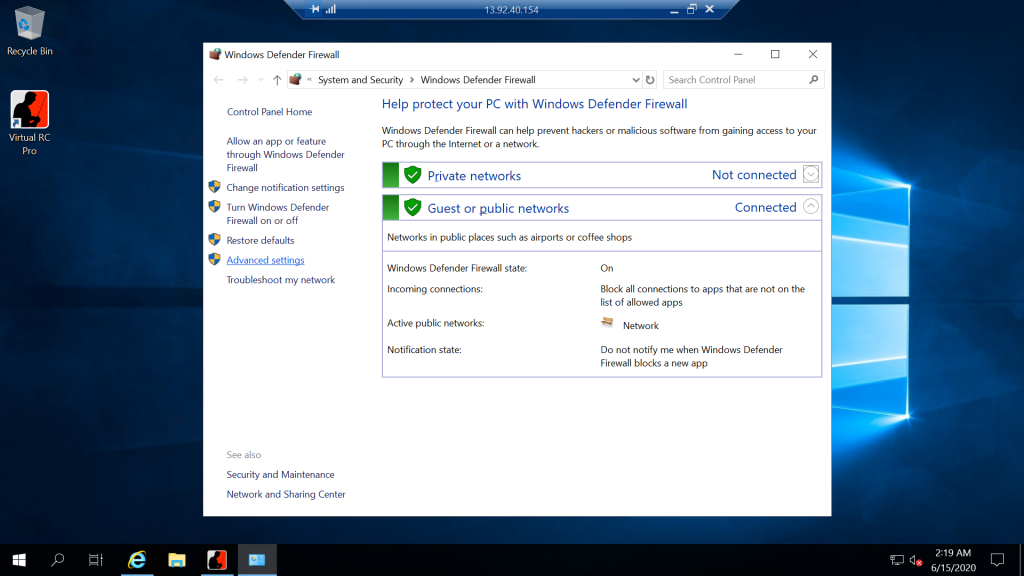
Once the Windows Defender Firewall control panel is open, click on Advanced settings.
Highlight Inbound Rules in the left pane, then click New Rule… in the right pane.
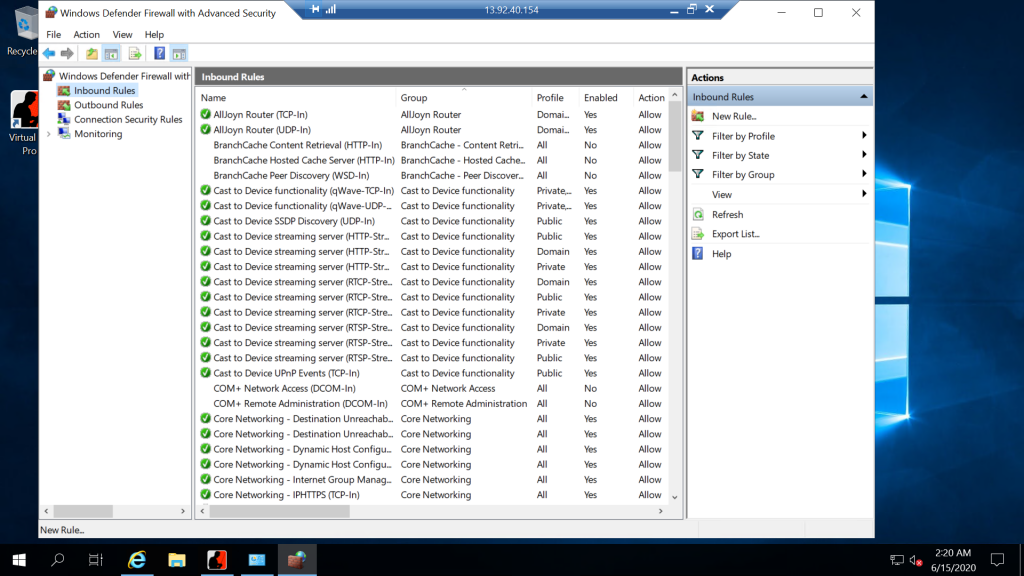
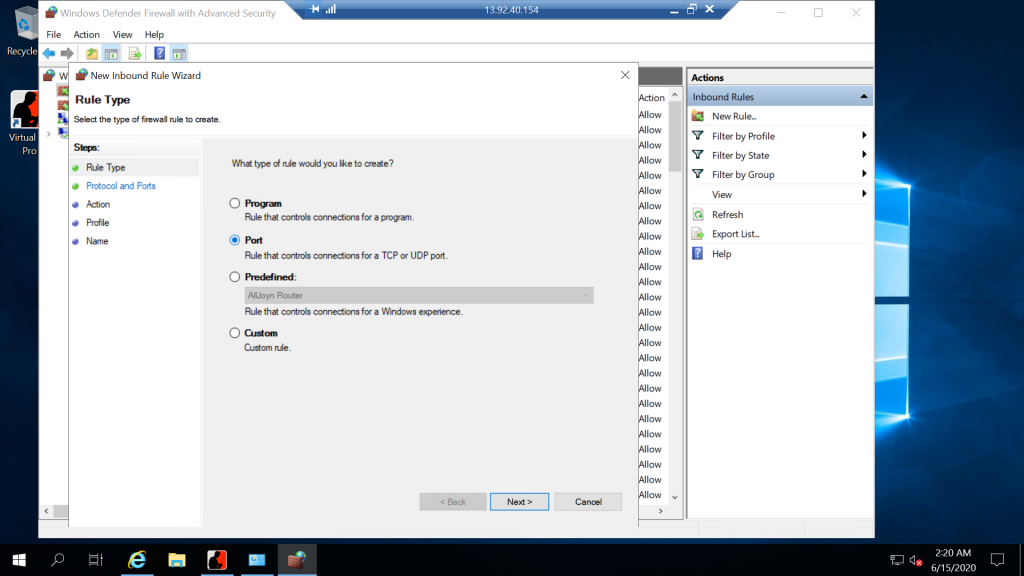
In the New Inbound Rule Wizard select Port for the rule type and click Next.
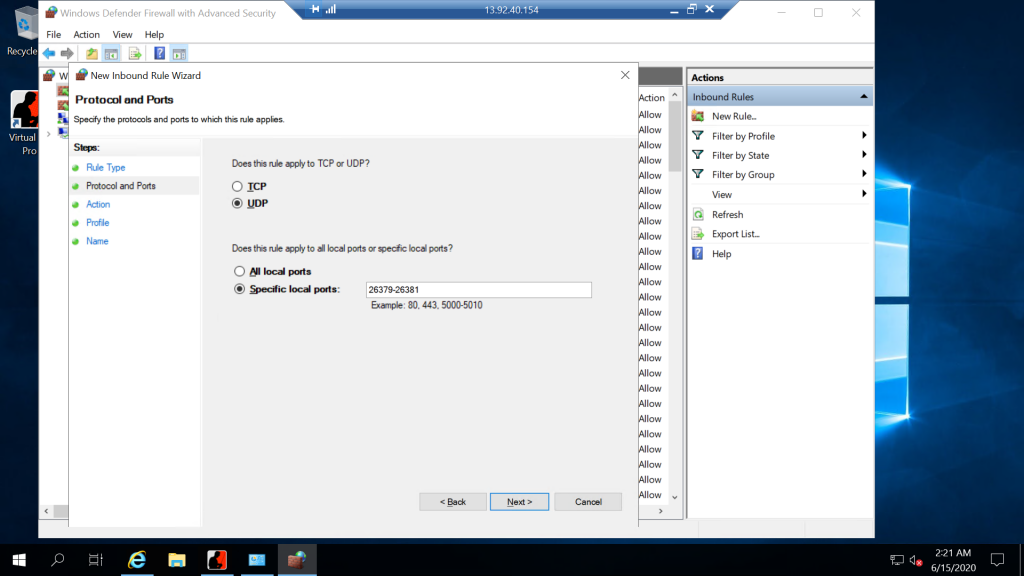
For the protocol and ports, select UDP and enter the port range of 26379-26381, then click Next.
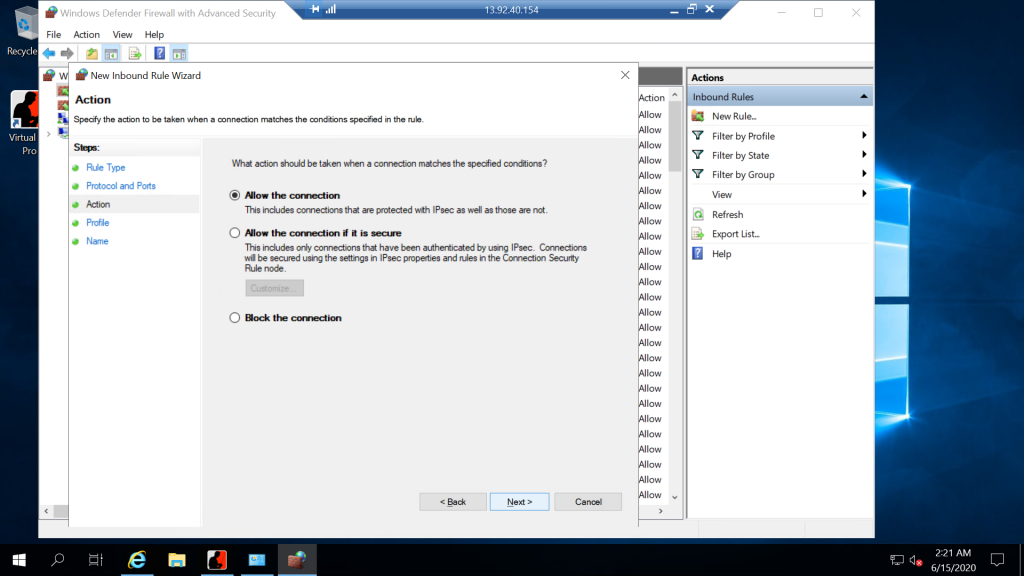
Action should be set to Allow the connection, then click Next.
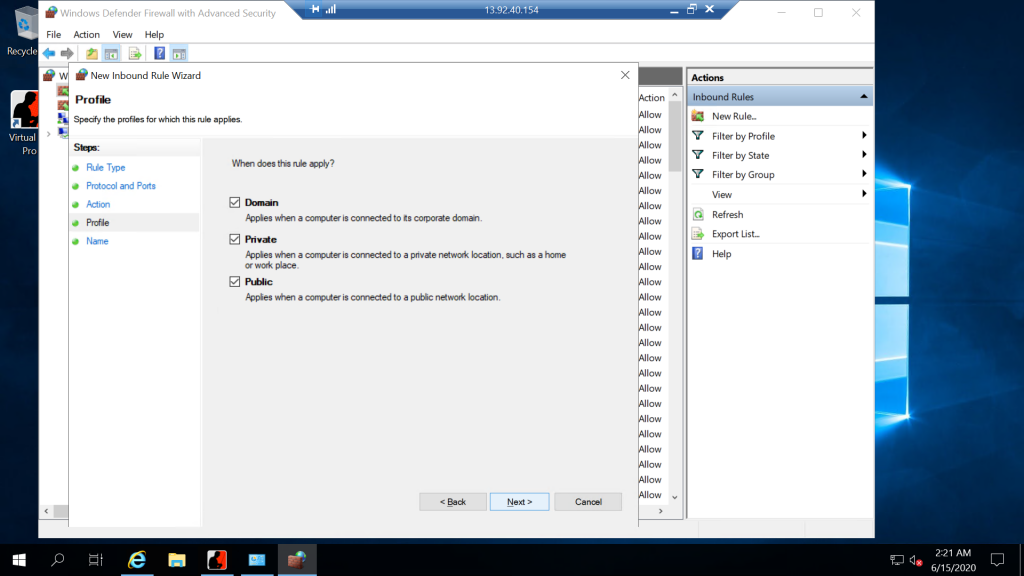
All profiles should be checked, click Next.
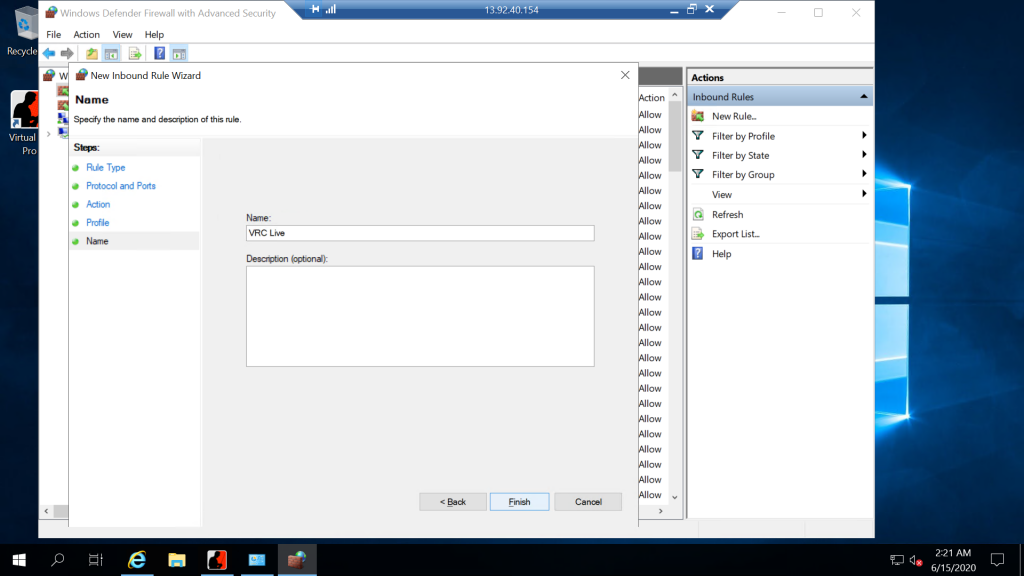
And then give it a useful name, like VRC. Then click Finish.
As mentioned earlier, if you’re using a Network Security Group (NSG) as part of your Azure resource group, then you’ll need to create the same inbound network rules there too.
Start VRC
Now you can start VRC, but we’re not out of the woods yet. VRC will likely complain about Internet Options:
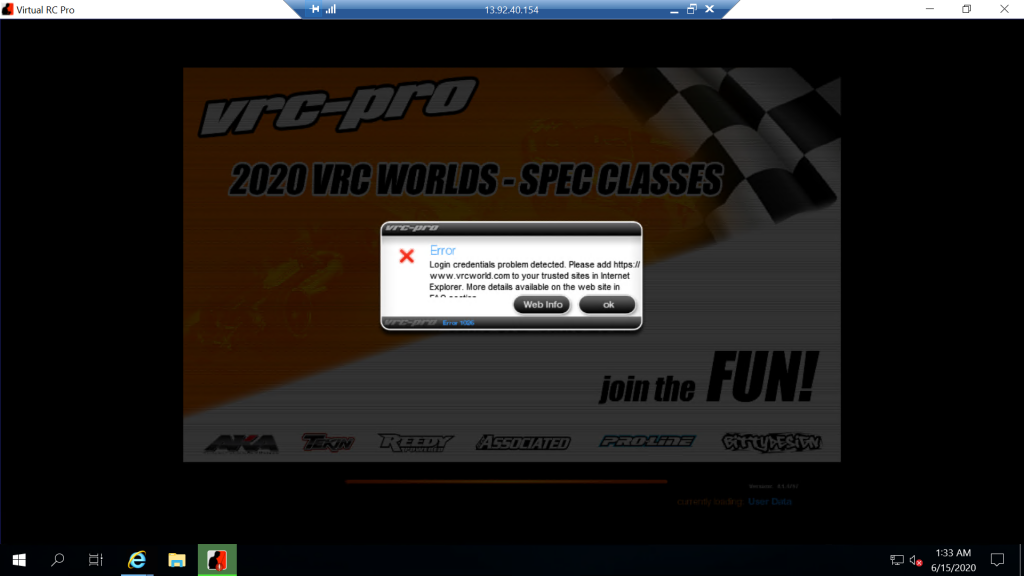
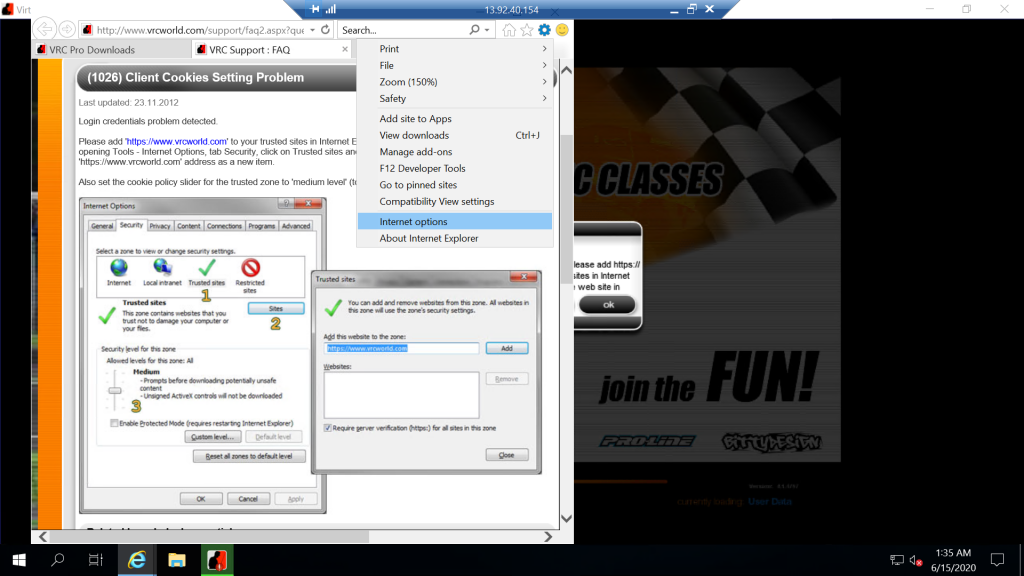
Clicking Web Info will bring you to a VRC FAQ page that explains how to remedy it. It will also open Internet Explorer, which is where you need to make the change – by clicking the gear icon, then Internet Options.
At this point, you should be ready to host a multiplayer race that anyone around the world can join.
I’ve hosted up to eight VRC racers live at once with this setup and noticed zero performance issues. I’m confident this platform would manage the maximum of 10 racers without a problem 🏎
Extras
There’s a couple more things you probably want to do:
- Download Chrome or Firefox so you don’t contemplate suicide when you need to download something else on your VM.
- Disable the Server Manager from automatically starting
- Install the NVidia drivers
- Install a virtual audio device if you want to hear the remote sounds locally.
Test!
The last thing you want to do is leave the testing up to your hardcore racing friends. Set up some races ahead of time and test it yourself, even if you’re the only one to join.
Better yet, leave some races open (without passwords) on a busy night and let passers-by join in. They can’t get bent out of shape if there are any issues, they can just move along.
Trouble Connecting in VRC
When I first set my server up I had intermittent problems where I could sometimes join the multiplayer session and sometimes not.
Here’s what I was doing:
- Start a browser on my local computer, visit the Azure portal and start my gaming server virtual machine
- Log in to the gaming server via RDP from my local computer
- Put the RDP into fullscreen
- Start VRC and create a “host only” multiplayer session
- Minimize the RDP session so I can run VRC locally
- Start VRC on my local computer
- Try to join the multiplayer session on the server
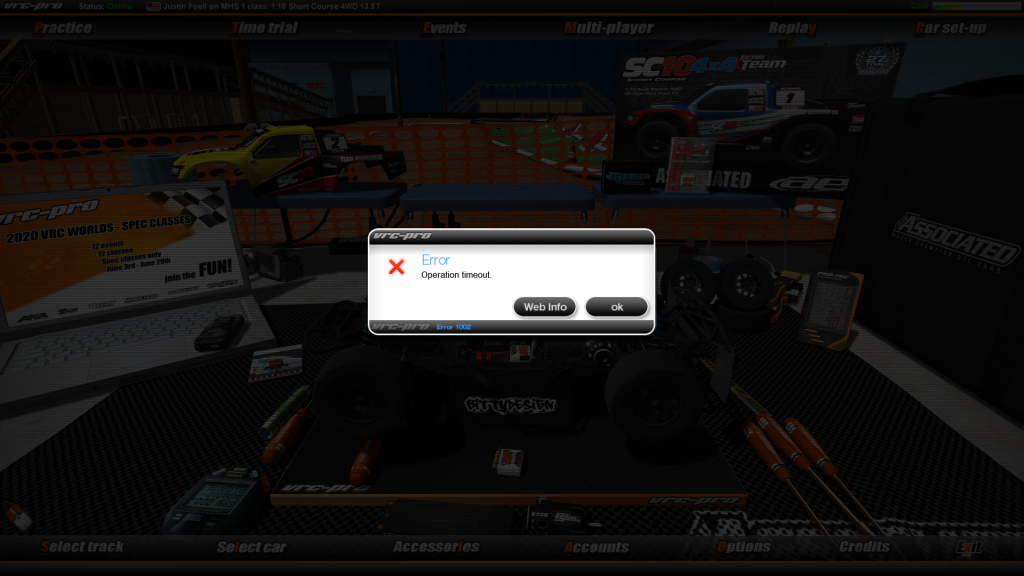
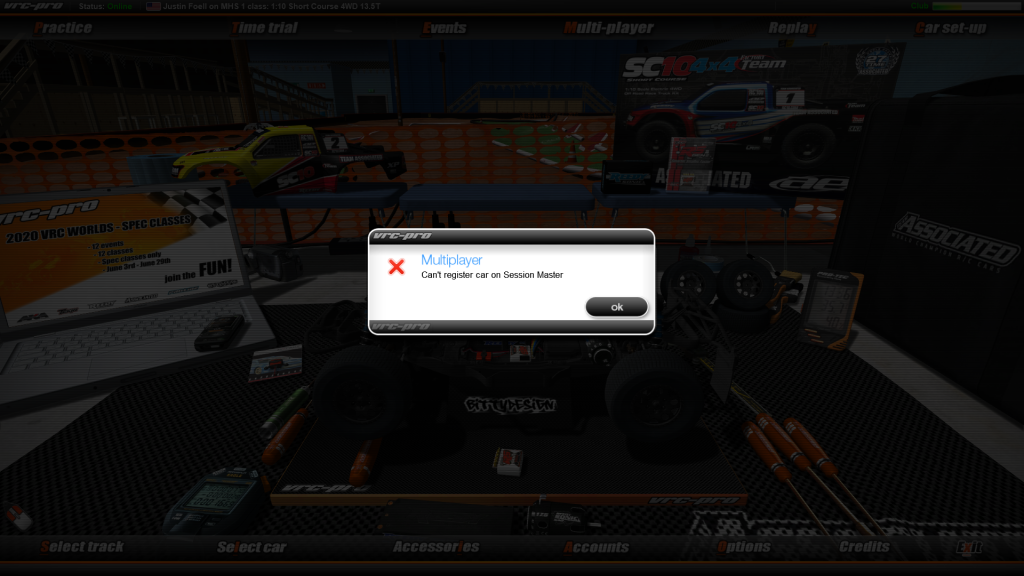
I had an “aha” moment when I remembered when I switch from VRC (fullscreen) to another program on my local system and switch back, it’s like the game pauses while I’m away. When I switch back to VRC it takes a good 10-15 seconds before it comes back to life.
If you’ve ever had windows update or some other nonsense dialog come up while you’re racing, you fully understand the madness that is involved.
The solution (without having to use two computers) was a setting in RDP to set Apply Windows key combinations to On this computer.
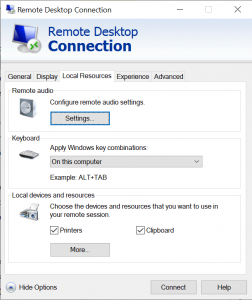
Otherwise I would press Alt+Tab when on the remote system and it would toggle between the VRC Server session and the desktop. By keeping that combination local, I can Alt+Tab to switch between RDP (fullscreen) and my local VRC game (fullscreen). Neither game session gets minimized so nothing hangs up or pauses.
Whew, that was a lot 😰 Did I forget anything? Let me know in the comments!

Leave a Reply