I’m new to helicopters, so the radio setup for the Assault 100 was a little daunting – especially given the fact that my transmitter has an alternate firmware (OpenTX) installed, and the Assault 100 printed manual settings for the Turnigy 9x assume you have stock firmware.
One other important detail I didn’t understand is that flybarless helicopters don’t use the helicopter functions built into the transmitter. Instead they have something similar to a quadcopter flight controller with gyro sensors to perform the stabilization function of the flybar. Rather than setting up the swash type and assigning the cyclic channels on the radio, the cyclic inputs can be sent as normal aileron and elevator controls – similar to a multi-rotor.
What still needs to be set up on the transmitter is the channel assignment, throttle and pitch curves, and reversing. That last part is extremely important and is how I broke my helicopter before it ever left the ground 🙁
I recommend that before you do any of this you remove the main rotor blades. While this helicopter is very small, a lot can happen fast and repairs on this tiny beast can be difficult.
This guide assumes you’re using OpenTX version 2.1 on your transmitter. Earlier/later versions may have different screens and options.
To Start
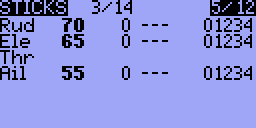
Start with a blank model. The Assault 100 manual and HCP100S manual provides some sane, but confusing default settings. Things like recommended endpoint percent vary from settings for the RTF radio, Spektrum, Walkera, Futaba, and Turnigy 9x (assumes stock firmware). However, it recommends 70% rudder for all models. Elevator and aileron endpoints are typically the same or within 5-10% of each other, with elevator usually being a little higher.
I took the 9x recommendations from the manual as slightly deadened sticks may help keep me out of trouble:
R: 70%
E: 65%
A: 55%
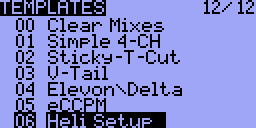
Then go to the templates screen and apply the Heli Setup template.
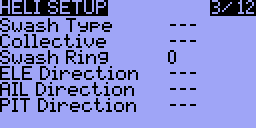
You’ll have to “undo” some of the settings from this template, but it will give you a good starting point for curves and mixes. The first thing we need to clear are the standard flybar/cyclic settings. Go the Heli Setup screen and clear the Swash Type and Collective settings so it looks like this:
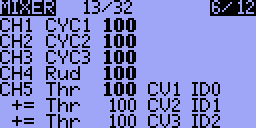
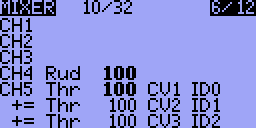
Then go to the Mixer screen and clear the cyclic settings from channels 1-3.
Channel Assignment
When the transmitter module is in “Futaba” mode (both green lights), the channels that that it receives from my OpenTX 9x and sends to the helicopter are as follows:
CH1: Aileron
CH2: Elevator
CH3: Throttle
CH4: Rudder
CH5: Gyro Gain (as a beginner, I’m not exactly sure how this effects flight characteristics)
CH6: Collective Pitch
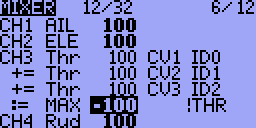
Knowing this we can assign the channels in the mixer screen as they should be. You may have to move some things around as well. After clearing cyclic 1-3 I assigned CH1 to aileron and CH2 to elevator. Then I moved the throttle settings from CH5 to CH3.
Throttle Sanity
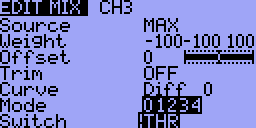
Also from the stock setup, I changed the throttle defeat to be !THR – I do this on all of my models. The radio will complain about the throttle arming switch when it’s towards the pilot at power-up. I find it dumb that in default OpenTX mixes, the switch towards the pilot is Safe/Off. Wouldn’t you want the transmitter to warn you if you turned it on and the throttle was armed?
Throttle & Pitch Curves
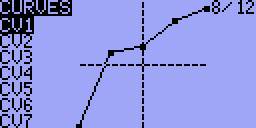
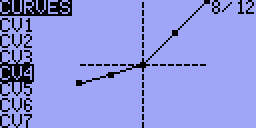
I didn’t deviate from the Heli Setup template for my curves as they’re pretty close to what the manual recommends. Plus there’s a “beginner/start-up” throttle and pitch curves on CV1/CV4 (respectively). To start I’m for sure going to be using the “beginner” curves that are activated when the flight mode switch is at “N” (ID0). The start-up throttle curve looks like this:
The start-up collective pitch curve looks like this:
Channel Reversing
Cyclic
With the helicopter on (but main rotor blades off!) and the throttle disarmed you can move the cyclic (aileron/elevator) stick to make sure the cyclic is going in the direction you want. It’s easy, when you stick left the right side of the cyclic should rise, making it look like it’s trying to roll to the left. Stick up should raise the back of the cyclic evenly, making it look like it’s trying to go nose-down.
Collective
Collective pitch helicopters are interesting/complicated because the throttle control serves two functions: controlling the throttle (duh), and controlling the pitch of the main rotor blades – sometimes referred to just as the pitch or collective for short. These controls must also work in cooperation with each other.
The key to understanding how to set this up in the transmitter is understanding OpenTX mixes. Basically we can create mixes that assign what the physical control sticks will send to the model. The throttle stick in our case needs to control the throttle as well as the collective pitch. CH3 in the mixer screen is bound to the throttle stick and the throttle curves. Also, CH6 is bound to the throttle stick for pitch curve, so when I move the throttle stick up and down, the pitch curve signal goes out on channel 6.
To test the pitch, put the blades on and turn the helicopter on, but leave the throttle disarmed. Moving the throttle stick should up should make the leading edge of the blades point up. If they go down when the stick goes up we need to do some reversing. But first an anecdote…
The reason I initially broke my heli was because on first flight my throttle was reversed. How I arrived at this was because the collective was moving in the opposite direction as I expected. Rather than reversing the collective (CH6), I reversed the input of the throttle channel (CH3). Reversing the throttle fixed the collective direction, but also reversed the throttle. When I armed the throttle this resulted in 100% speed. I would have had to move the stick all the way up to put the throttle at 0%. At a time when the helicopter is flailing wildly it didn’t occur to me – only after it was broken did I realize my folly.
Let me reiterate – reversing CH3 in my setup reversed the throttle and the collective pitch. To reverse just the collective pitch I needed to reverse CH6. Reversing the collective pitch and throttle channels in various combinations should help you get your settings in sync. To get them in sync, the best way I found to test this is by viewing this screen on the transmitter with the throttle armed (and the helicopter unplugged):
In my case the bars needed to move in the same direction: to the left as the throttle went up. Hopefully this provides some insight not only for those looking to set up their CP Heli with OpenTX, but how OpenTX functions in general.

You dont have settings for the turnigy 9xr? Trying to setup the hcp100s but its not right. Its differant than the 9x. Swash plate moves on its own. And ail speeds up thr. Something us not right. I will try your setup and see if it works on the 9xr.
Thxs.
Reuben
I don’t have settings to download for the 9xr, but I believe it uses OpenTX, so you should just be able to follow the screens and make the same settings/adjustments. When I use the HiSky module, I have it set to “Futaba” mode. The channels may map differently if you select a different mode.
It uses differant protocol. It can use openTX. I found a good video on youtube with a flybar setup that I will
Try.
Great stuff, thank´s!
So what are your settings on chanel 6, do you have a picture of that to?
Yes, it appears I left that detail out. The “Heli Setup” from the templates screen will put the collective mixes on CH11. I just moved them all up to CH6:
Thank´s!
Did channel 5 make any different when you flip the gea switch?
I couldn’t tell with this little bird as I’m brand-new to CP helis, and I’ve got my hands full just keeping it stable/upright. It’s supposed to affect the gyro settings, but I honestly couldn’t tell.